> For the complete documentation index, see [llms.txt](https://docs.cyberx.com/cyberx-one/llms.txt). Markdown versions of documentation pages are available by appending `.md` to page URLs; this page is available as [Markdown](https://docs.cyberx.com/cyberx-one/guides/api-creation.md).
# API Creation
Creating an API allows you to connect to exchanges' servers via several programming languages. Data can be pulled from exchanges and interacted with in external applications. You can view your current wallet and transaction data, make trades, and deposit and withdraw your funds in third-party programs.
Creating an API is a simple process that can be completed in just 5 minutes.
## How to create an API in Binance?
1\. After logging into your Binance account, click **\[API Management]** from the user center icon.

2\. Enter a label/name for your API key and click **\[Create API]**.Security tip: Before creating an API, you need to enable [**two-factor authentication**](https://academy.binancezh.top/en/articles/binance-2fa-guide) (2FA) on your account.

3\. Complete the security verification with your registered 2FA devices.
4\. Your API is now created. **Please keep your Secret Key securely as will not be shown again. Do not share this key with anyone.** If you forget your Secret Key, you will need to delete the API and create a new one.Please take note of the IP access restrictions. We recommend choosing **\[Restrict access to trusted IPs only]** for security reasons.
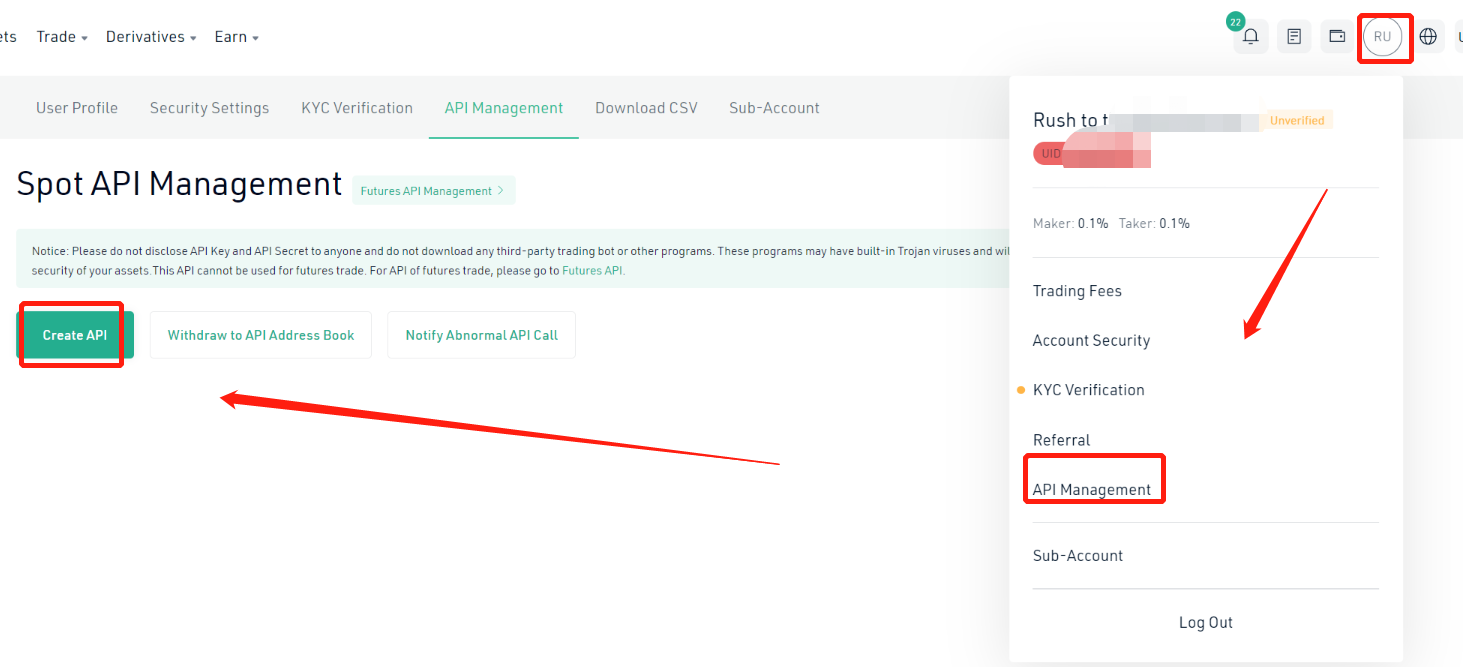
## How to create an API in Kucoin?
**Step 1:**
Please log in to your KuCoin account, open the drop-down menu in the avatar in the upper right corner and select **‘API Management’**, then click **‘Create API’**;
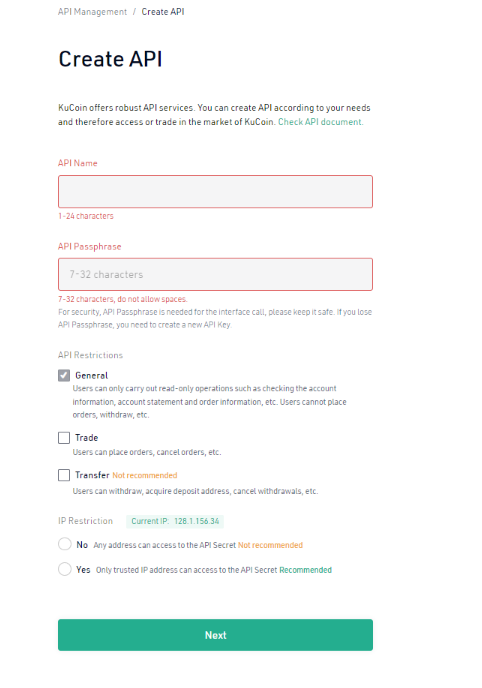
**Step 2:**
Please set your 'API Name and API Passphrase (password). Please note that this password is very important. It is recommended that you keep a record of it properly. You will need the API password for verification when using the API; About API Restrictions and IP Restrictions, please do the choice according to your needs.
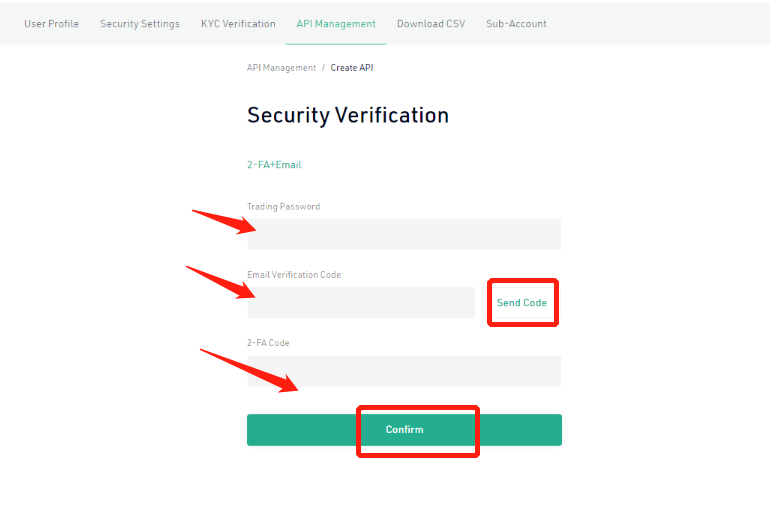
**Step 3:**
On the security verification page, you can choose to get verified through 2FA and Email or SMS. Please complete all the verification details needed, then click ‘Confirm’ to create the API;
Enter your "Trading Password", "Email Verification Code", and "2FA Code" or switch to "SMS verification code":
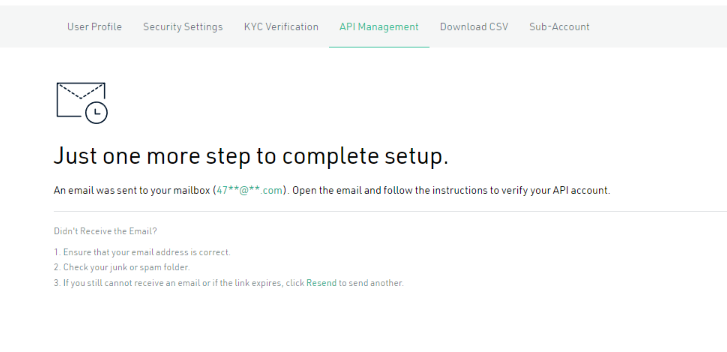
**Step 4:**
**Activate your API in email. Please open the email and click the activate your API.**
**Step 5:**
**Then you will be back to API Management page on KuCoin. The API is created successfully.**
You are able to create multiple APIs at the same time, but please keep your API passwords in a safe place.
## How to create an API in Gate.IO?
#### Open Gate.io website. Place your cursor on top of the profile icon to unfold the menu and click on "API Management". 
#### Click on "APIv2 Keys" on the menu. 
#### Input your fund password and TOTP to view your APIv2 keys. 
**Note: Older API keys will expire when new API keys have been generated.**
API keys can be used to query information of the account and also to trade, withdraw funds, etc.
Please keep your API keys safe and do not ever share them with anyone else!
### Create new APIv4 keys
Go to "APIv4 Keys". Make sure "APIv4 Keys Management" is selected. Click on the top-right "+ Create new API Key" button.
**Note: You can give a remark, assign permissions and add an IP whitelist to this new API key.**
After creating an API key, you can view, edit or delete the key. 
### Notice:
① APIv2/4 keys have permissions to withdraw and deposit.
② The differences between APIv2 and APIv4 are as follows:
> •APIv2 keys and APIv4 keys are independent of each other.
>
> •APIv2 keys are only permitted to conduct spot trading while APIv4 keys are granted full access to spot trading, margin trading, and contract trading.
>
> •You need to scroll down to the bottom of the page of your APIv2 keys to create new APIv2 keys. APIv4 keys are created in "Personal Center" - "Sub account and API" - "APIv4 Keys".
\*Decide between APIv2 and APIv4 according to your own specific demands. Please refer to this article for updates on their features.
If the article can not help with your questions, please give us feedback through a ticket. Please include the following information in the ticket:
Your UID, URL of the original request, parameters and a thorough description of your request, whether the API key is for spot or margin trading, mainnet or testnet, the programming language (the codes for sending the request would be great), whether SDK is used (if yes, please describe how to use it or comment in GitHub).
**Frequency limit rule.**
\
\
The rate limit is counted against each sub-account or main account.\
\
**WebSocket:**\
\
•The message limit sent to the server: unlimited.\
•Number of connections per IP: ≤ 300\
\
**NOTICE:**\
\
When repeatedly violating rate limits, it depends on\
\
•the request< burst rate, the request will have a delay.\
•the request> burst rate, the request will be declined.
## How to create an API in FTX?
### 1.1 Log in to your account on
### **1.2** Follow the link

### 1.3 Click on the button “Create API Key”.

## How to create an API in Coinbase?
In order to get started with the Coinbase API, you’ll need to go over to their website () and sign up for an account.

In the top right corner you’ll see a “Get started” button that will take you to the account creation screen when you click it. After that, you’ll enter your first and last name, email and password. When everything is written click the “Create account” button.
After that, you’ll need to verify your email and add a mobile phone number for two-step authentication. Be sure to have your phone with you as you’ll get a lot of authentication messages while following through this article.

The next step is to obtain our API key. When you’re all logged in, click on your profile icon in the top right corner and go to settings. From there, click on the API section and press the “+ New API Key” button.

The following screen will appear:

You’ll select the type of account you want and permissions you’ll have access to. On the newly appeared window you can also select the notification URL and input allowed IP addresses.
When you’re done click create. Also, have in mind that you can create multiple API keys with your account. When created, you’ll get your API key and API Secret.

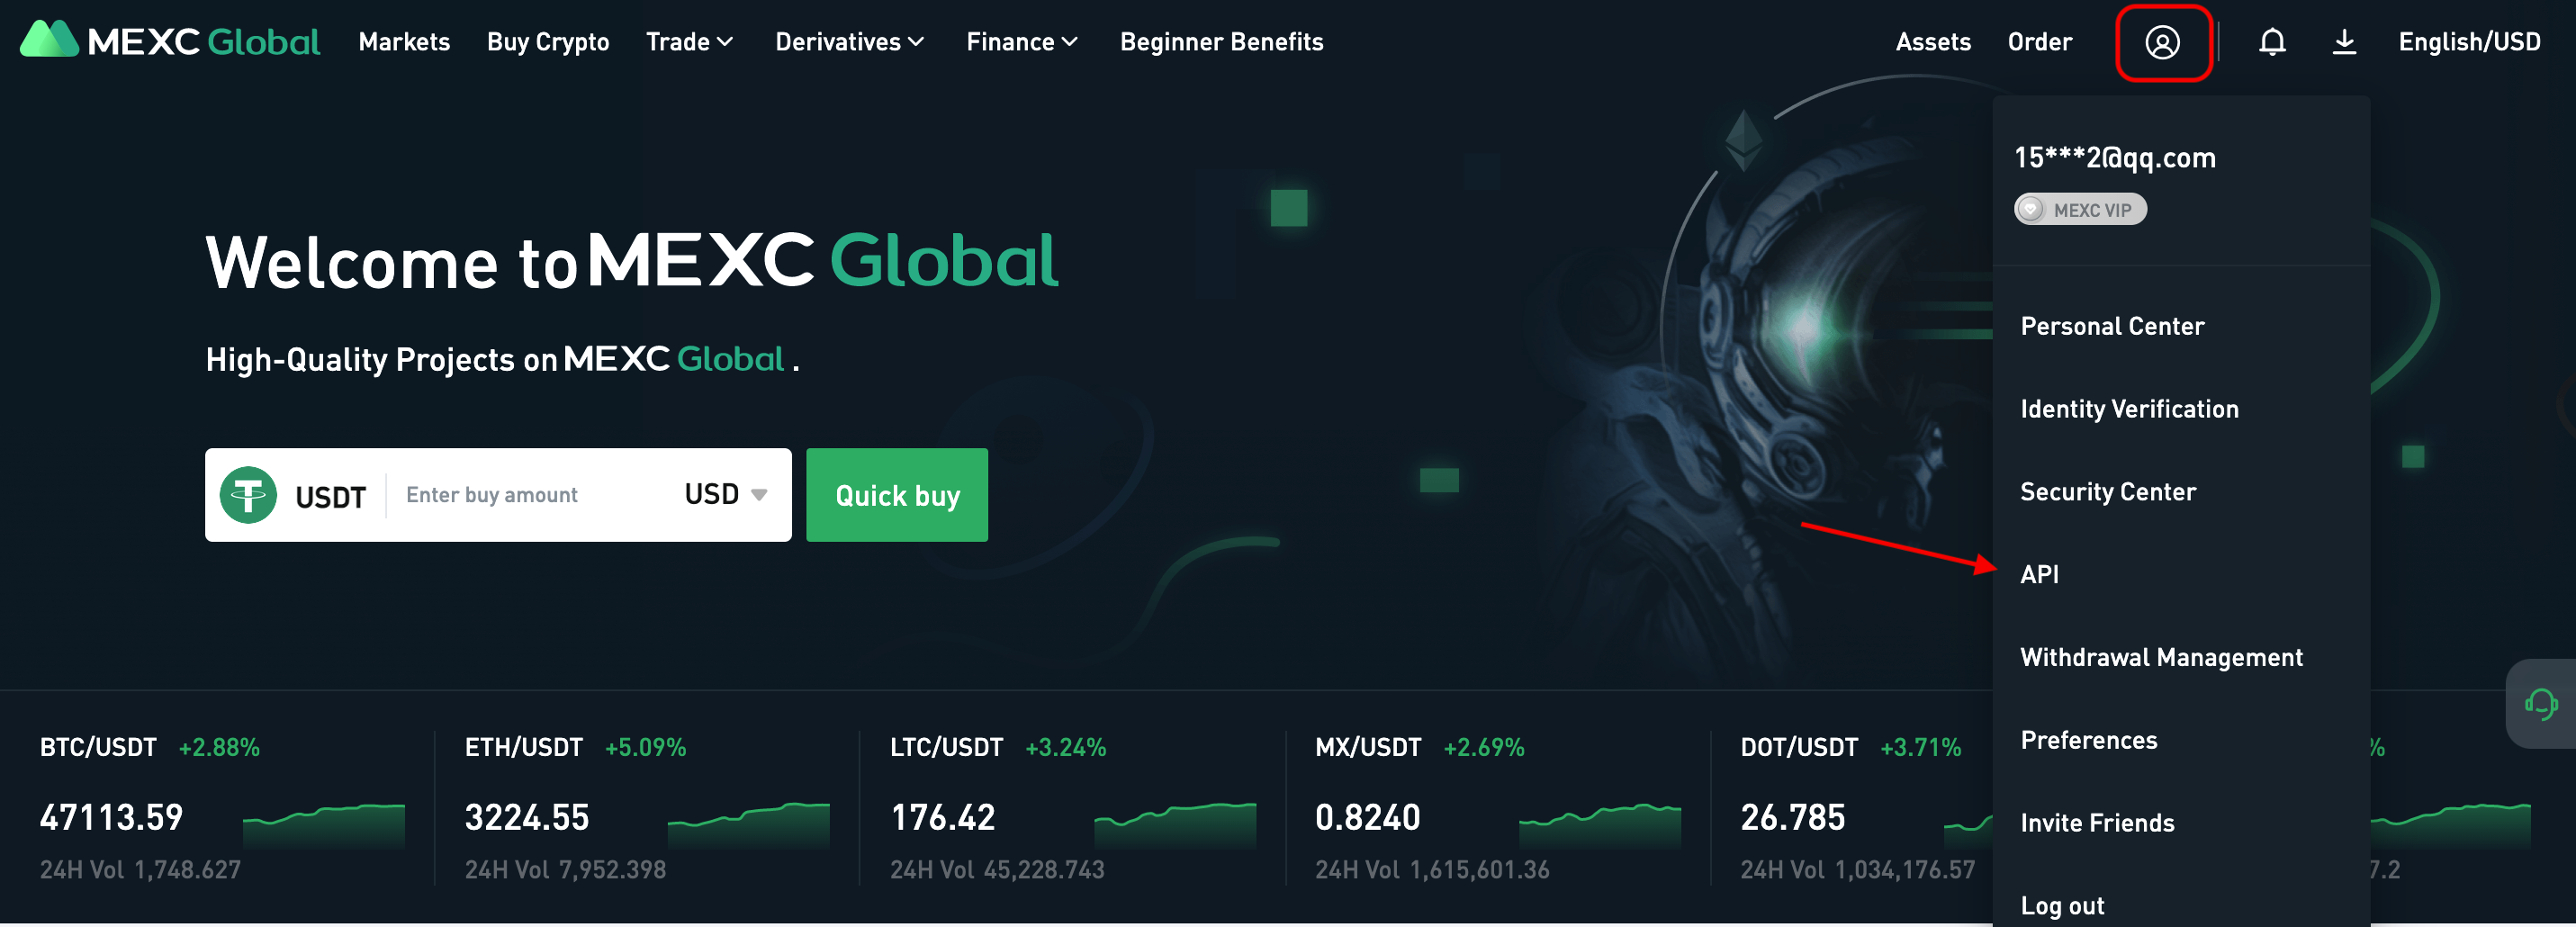
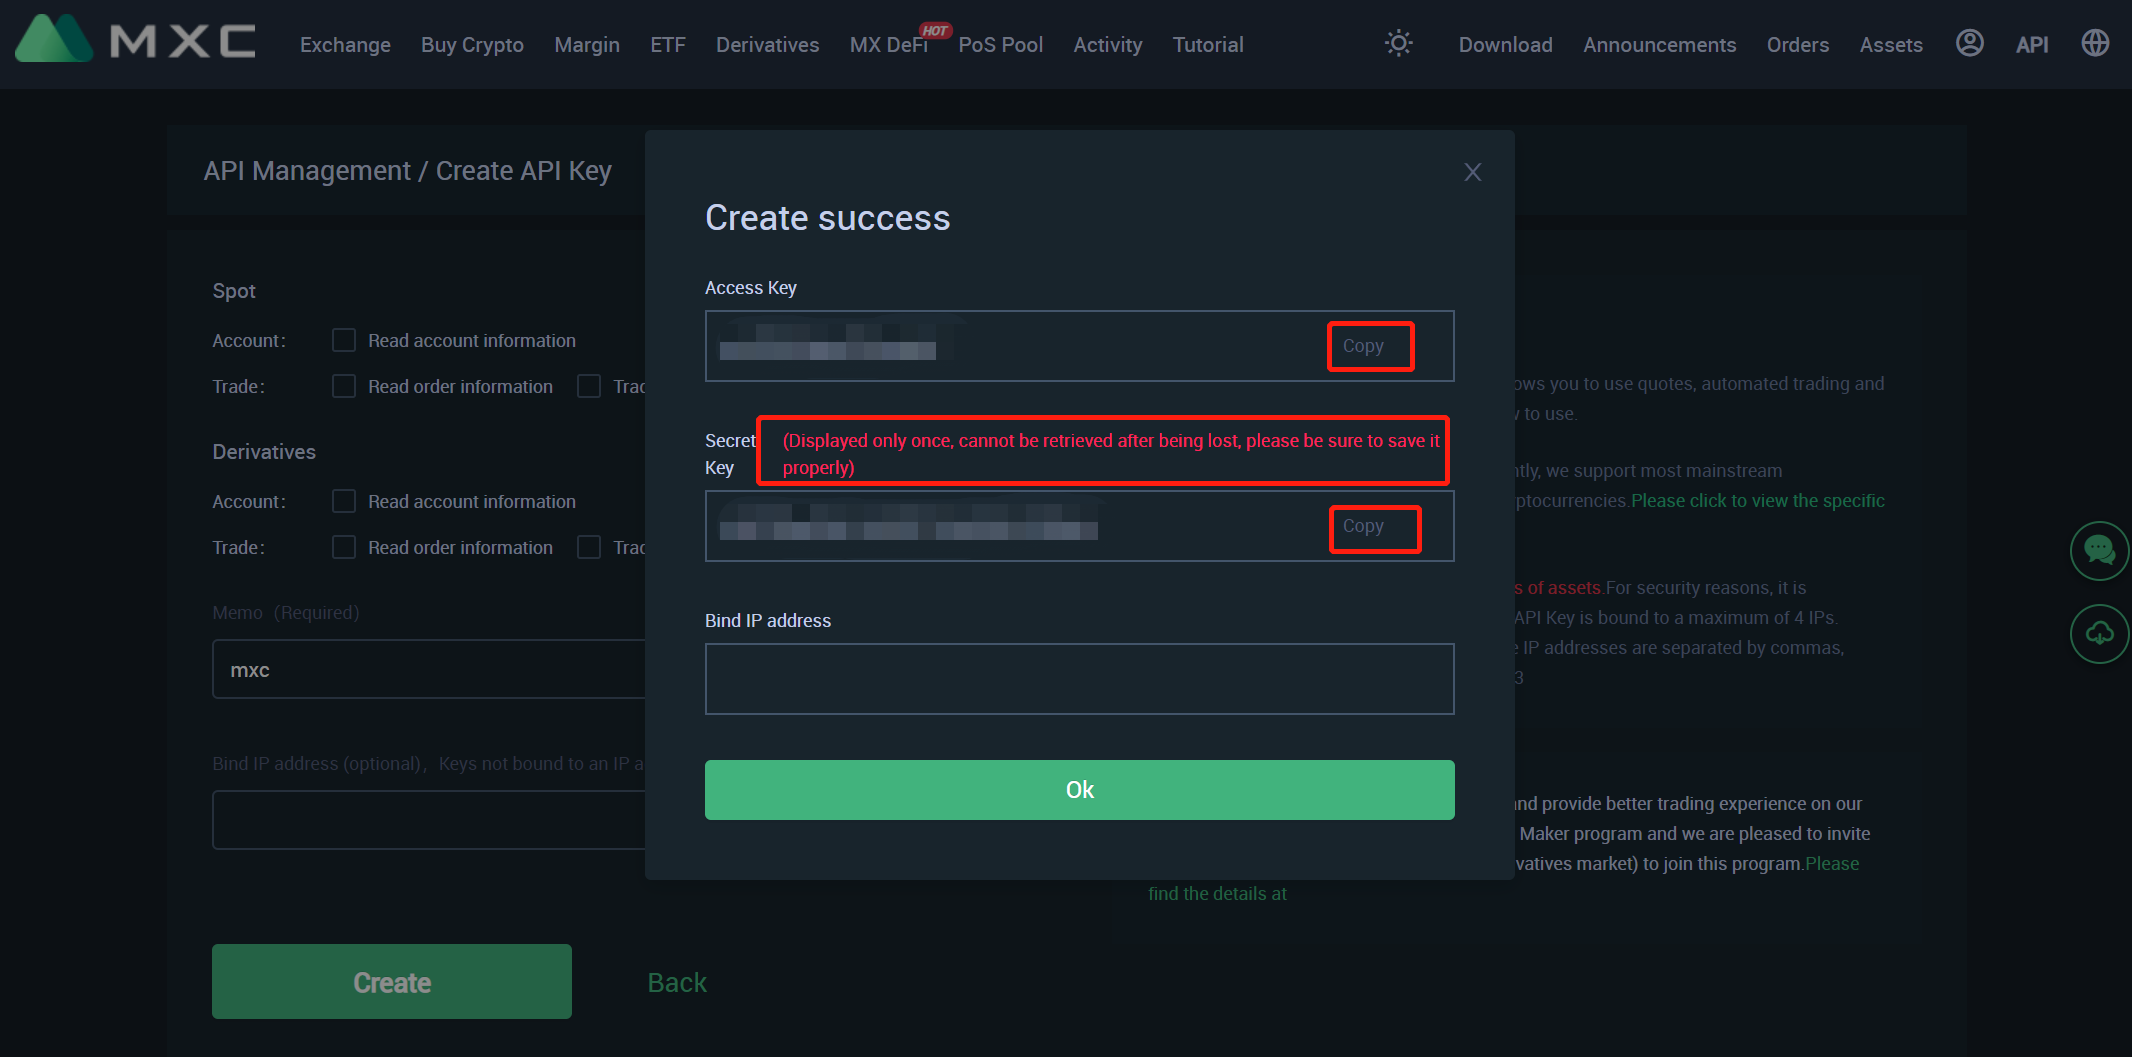
## How to create an API in MEXC?
**Step 1:** Enter MEXC official website.
* [https://www.mexc.com/ ](https://www.mexc.com/)
* (alternative address)
**Step 2:** Choose **\[API]**.
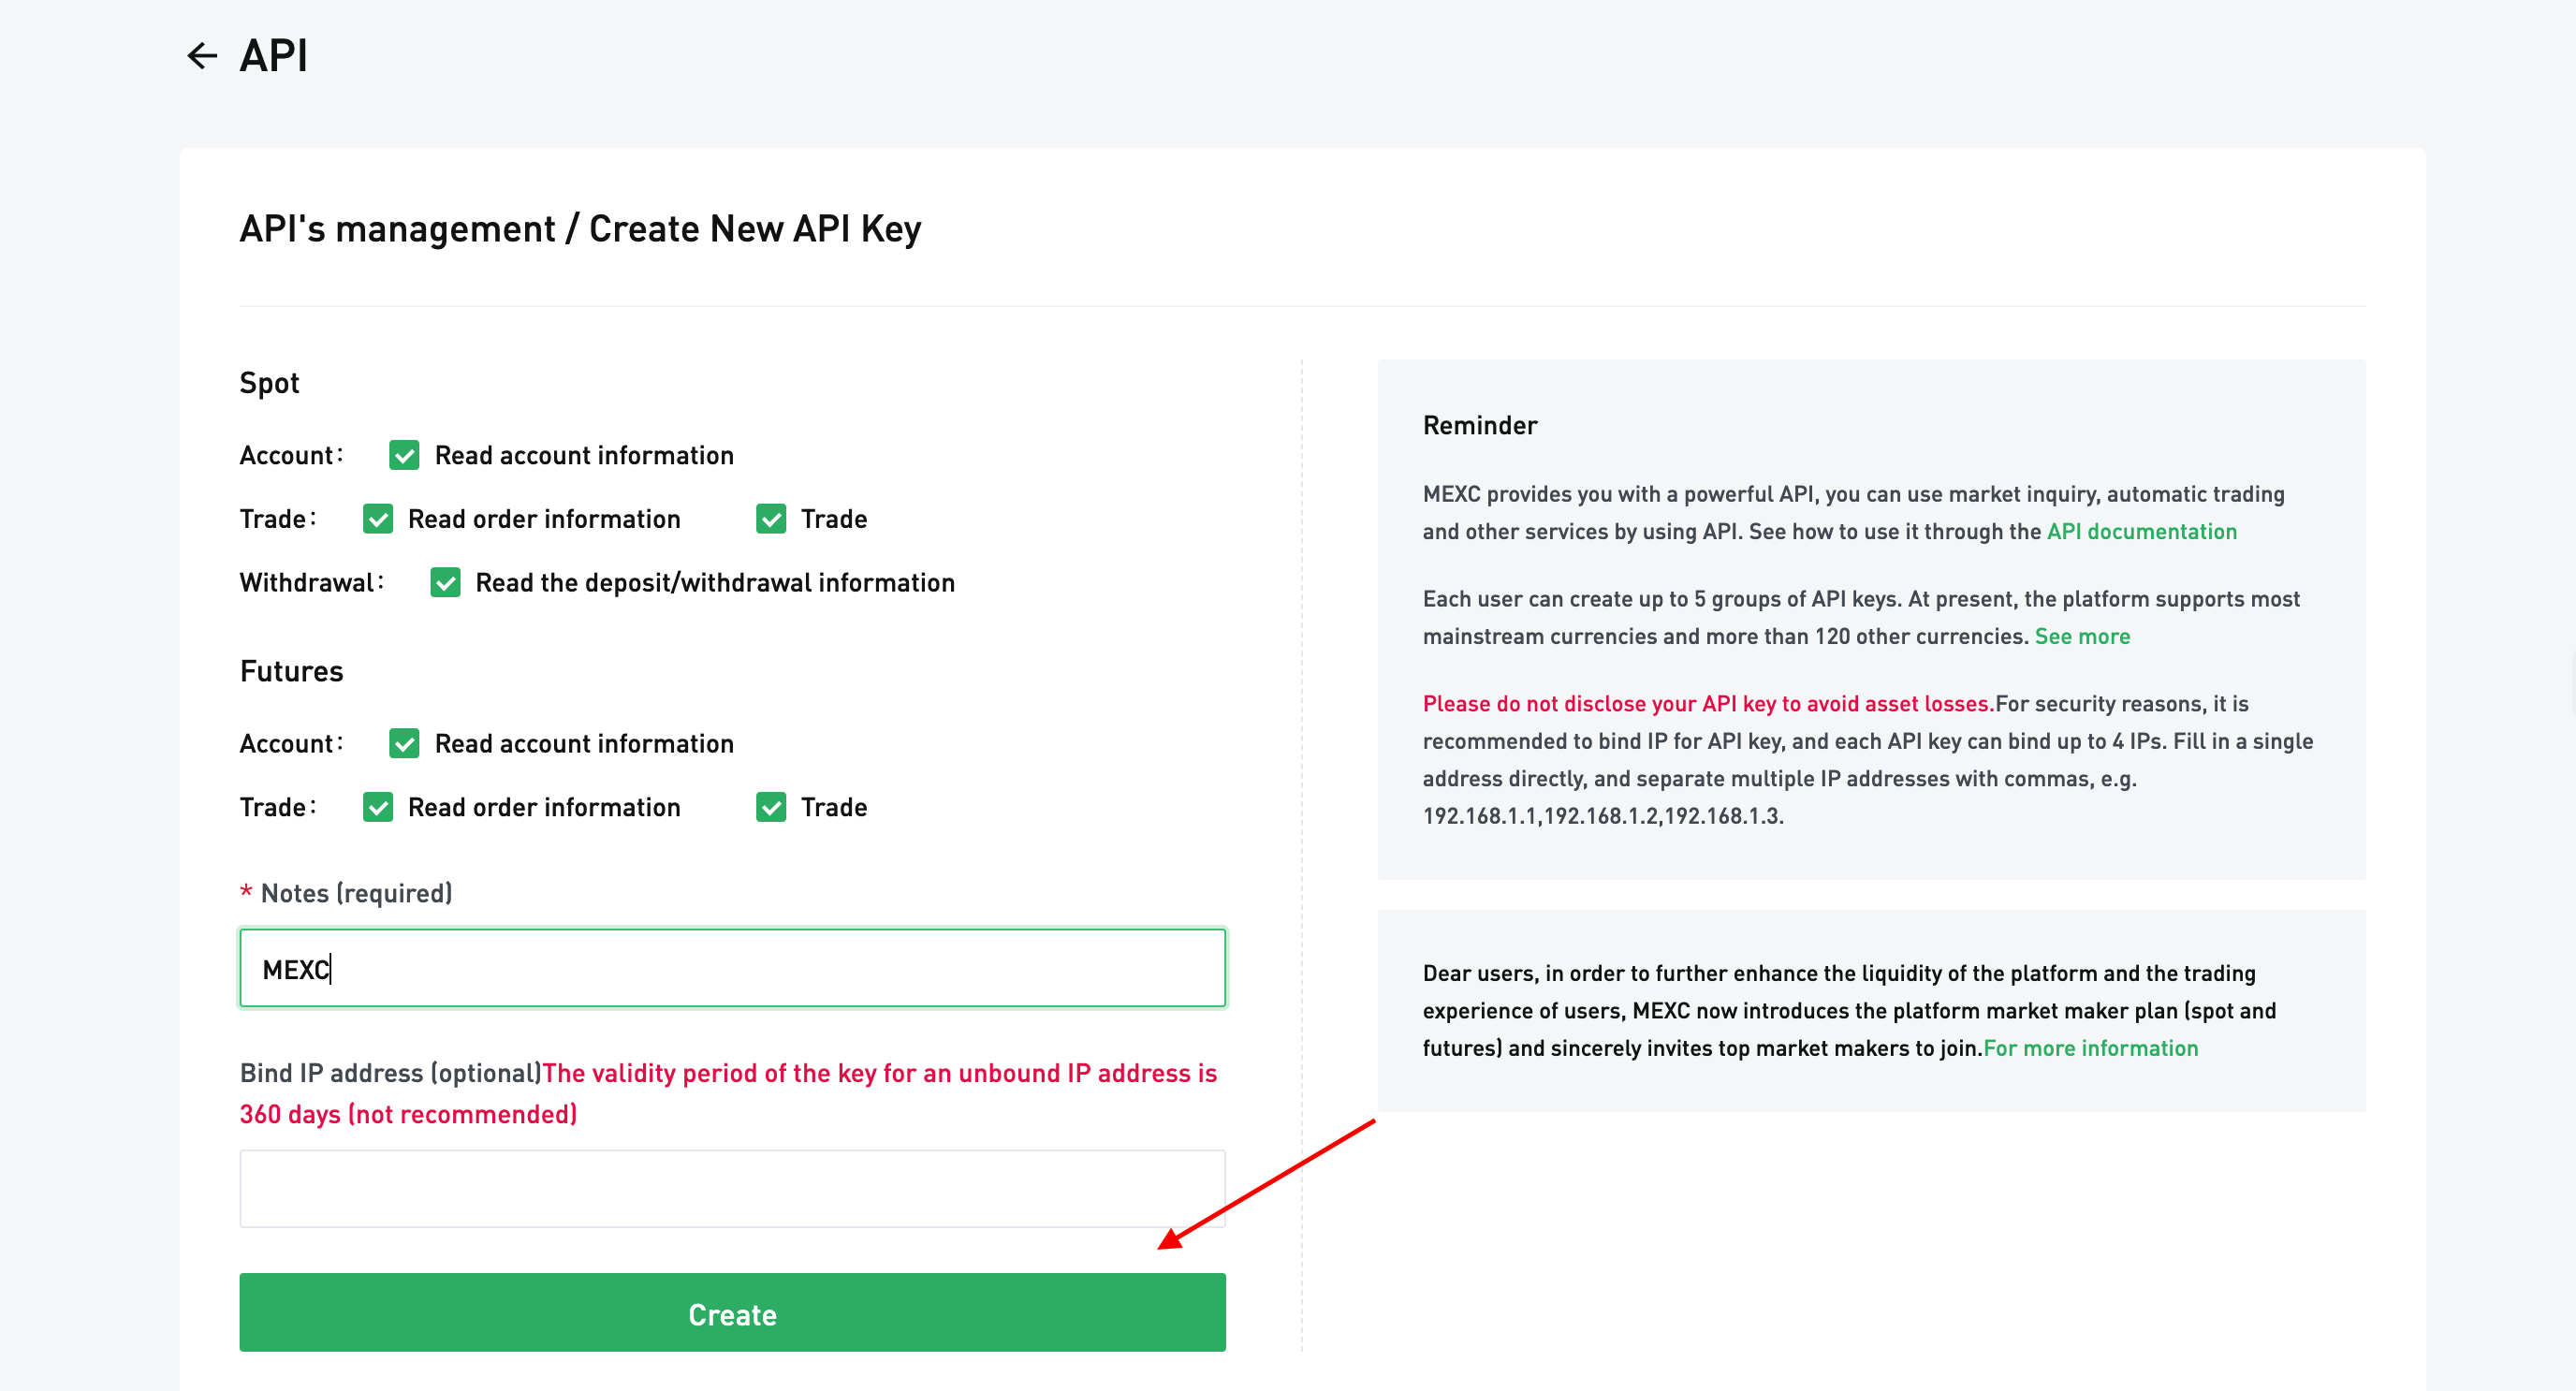
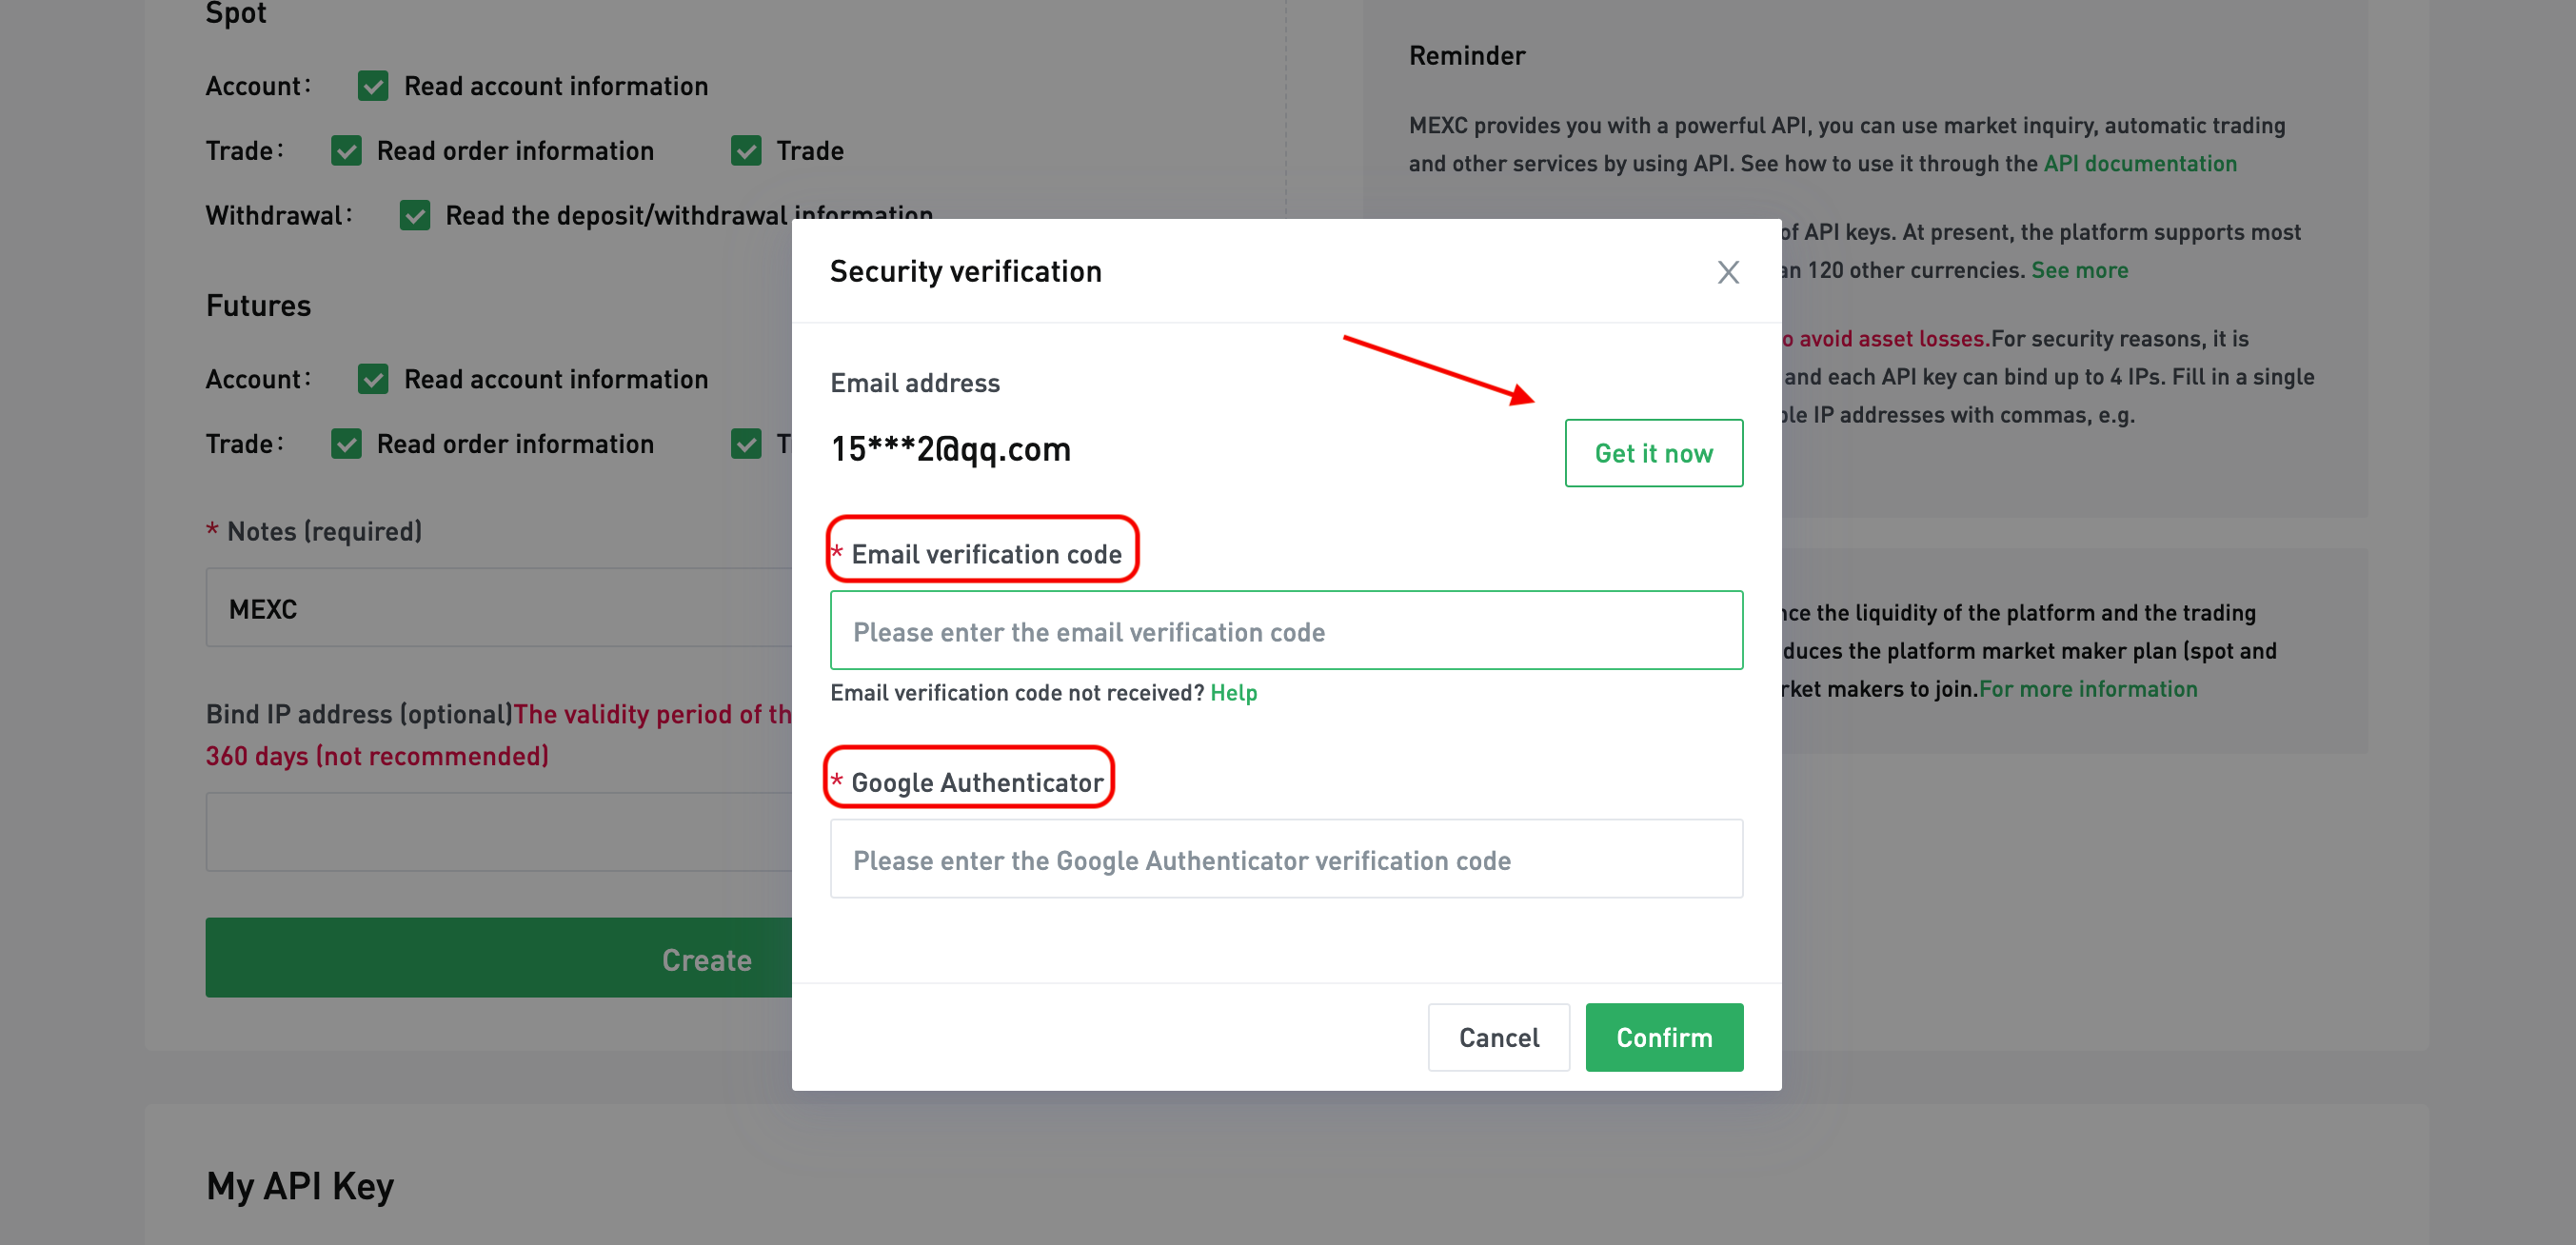
**Step 3:** Click **\[Create]** and complete the security validation.
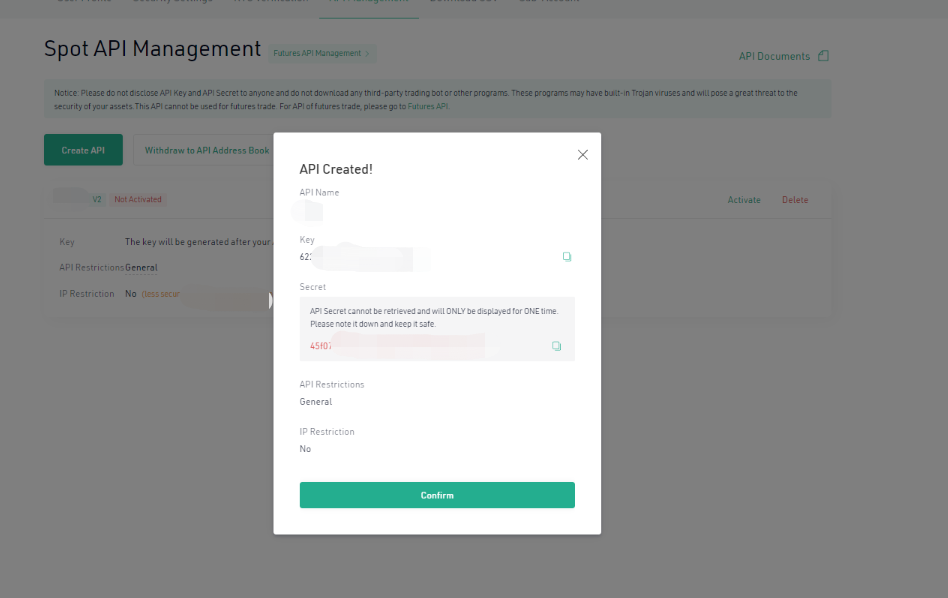
**Step 4:** Remember your Access Key and Secret Key after completing security validation.
## How to create an API in Bybit?
1\) To create/manage your Bybit API keys, API users may click onto the top right of the main page: **'Username' > 'Account & Security',** and then select onto **>** “**API** **Management**”

2\) In this section, API users can either create/add or delete your API Keys with the following actions:

3\) Enter your API information, such as a reference name for your API key under 'Name' and your IP Address, and proceed to enter your Google authenticator 2FA code before you click on “Confirm”
You may also choose to Bind to a Third-Party Application.
